shubo的博客

gopher/全干工程师

0%

DELL iDRAC CheatSheet

默认账号密码

root/calvin (忘记密码可以重置)

DELL iDRAC 远程桌面

  1. windows下使用ie浏览器可以直接在浏览器开启远程桌面
  2. 其他操作系统使用java7版本的javaws运行viewer.jnlp,见下文

java连接iDRAC 可能碰到的问题

由于iDRAC可能版本过老,使用以下方法可以暂时解决

  1. 安装java7版本。否则可能出现 查看器已终止。原因:网络连接中断。问题

  2. 进入 java 控制面板-> 高级 -> 高级安全设置 勾选使用TLS1.x,并在在安全选项增加idrac为例外站点。

1
2
3
windows 可以控制面板中找到java进入java控制面板
mac/linux 同理也可以在设置中找到java进入java控制面板
或者是在终端输入 javaws -viewer 命令也可以打开java控制面板
  1. 编辑主机hosts文件将idrac的IP与idrac name进行绑定。登录时显示的常用名作为hostname配置到hosts。否则可能出现 登陆失败,并出现无法访问错误问题 常用名:
    1
    2
    3
    4
    # vim /etc/hosts

    10.0.0.192 idrac

DELL ipmi CheatSheet

风扇控制

(用来在允许的情况下强制降低服务器噪音)

  1. 停止服务器的自动风扇控制,最后一位0x00表示停止自动风扇控制,0x01为开启自动风扇控制。

    1
    ipmitool -I lanplus -H idrac控制地址 -U 用户名 -P 密码 raw 0x30 0x30 0x01 0x00
  2. 手动设置风扇(需要先停止自动风扇),最后一位0x01为设置1%的转速(16进制)。

    1
    ipmitool -I lanplus -H idrac控制地址-U 用户名 -P 密码 raw 0x30 0x30 0x02 0xff 0x01

传感器

  1. 查看温度
    1
    ipmitool -I lanplus -H idrac控制地址-U 用户名 -P 密码 sensor list

了解到cloudflare强大的转发功能很长时间了。前段时间脑子一热就入了一个cloudflare的域名。今天正好遇到了必须免端口访问的需求。这次再来补一下关于https的免端口访问步骤。

前提:

  • 有公网IP
  • 已经购买cloudflare域名

免端口访问,顾名思义就是使用http/https默认的80和443端口访问指定的服务。
而已知家用宽带运营商肯定是禁用这两个端口的,因此无域名隐式转发的情况下,就只能使用一些其他没被禁用的端口访问了。
而cloudflare刚好具备这个功能,这次就是依靠隐式转发实现。也就是说外网端口映射本质上还是非80和443,只是在cloudflare这一层会帮助你隐藏掉而已。

Cloudflare 配置

首先设置cname解析并开启cloudflare的代理

1
2
selefra-apiserver.shubolab.com.	1	IN	CNAME	home.shubolab.com.
selefra-baseapi.shubolab.com. 1 IN CNAME home.shubolab.com.

在Origin Rules中新建规则:

1
(http.host eq "selefra-baseapi.shubolab.com") or (http.host eq "selefra-apiserver.shubolab.com")

重写到58080

nginx 转发配置

转发描述 来源主机名 来源协议 来源端口 目标协议 目标主机名 目标端口
[cloudflare] selefra-apiserver selefra-apiserver.shubolab.com http 58080 http 192.168.123.3 58018
[cloudflare] selefra-baseapi selefra-baseapi.shubolab.com http 58080 http 192.168.123.3 58008

到此配置就完成了。注意此域名配置的http服务只是在我电脑本地做代码调试的时候会临时开启。各位师傅就不要打了,不是常开的服务。

IP 地址定义

节点名称 IP地址
ubuntu22-4-node0/master 192.168.123.20
ubuntu22-4-node1 192.168.123.21
ubuntu22-4-node2 192.168.123.22

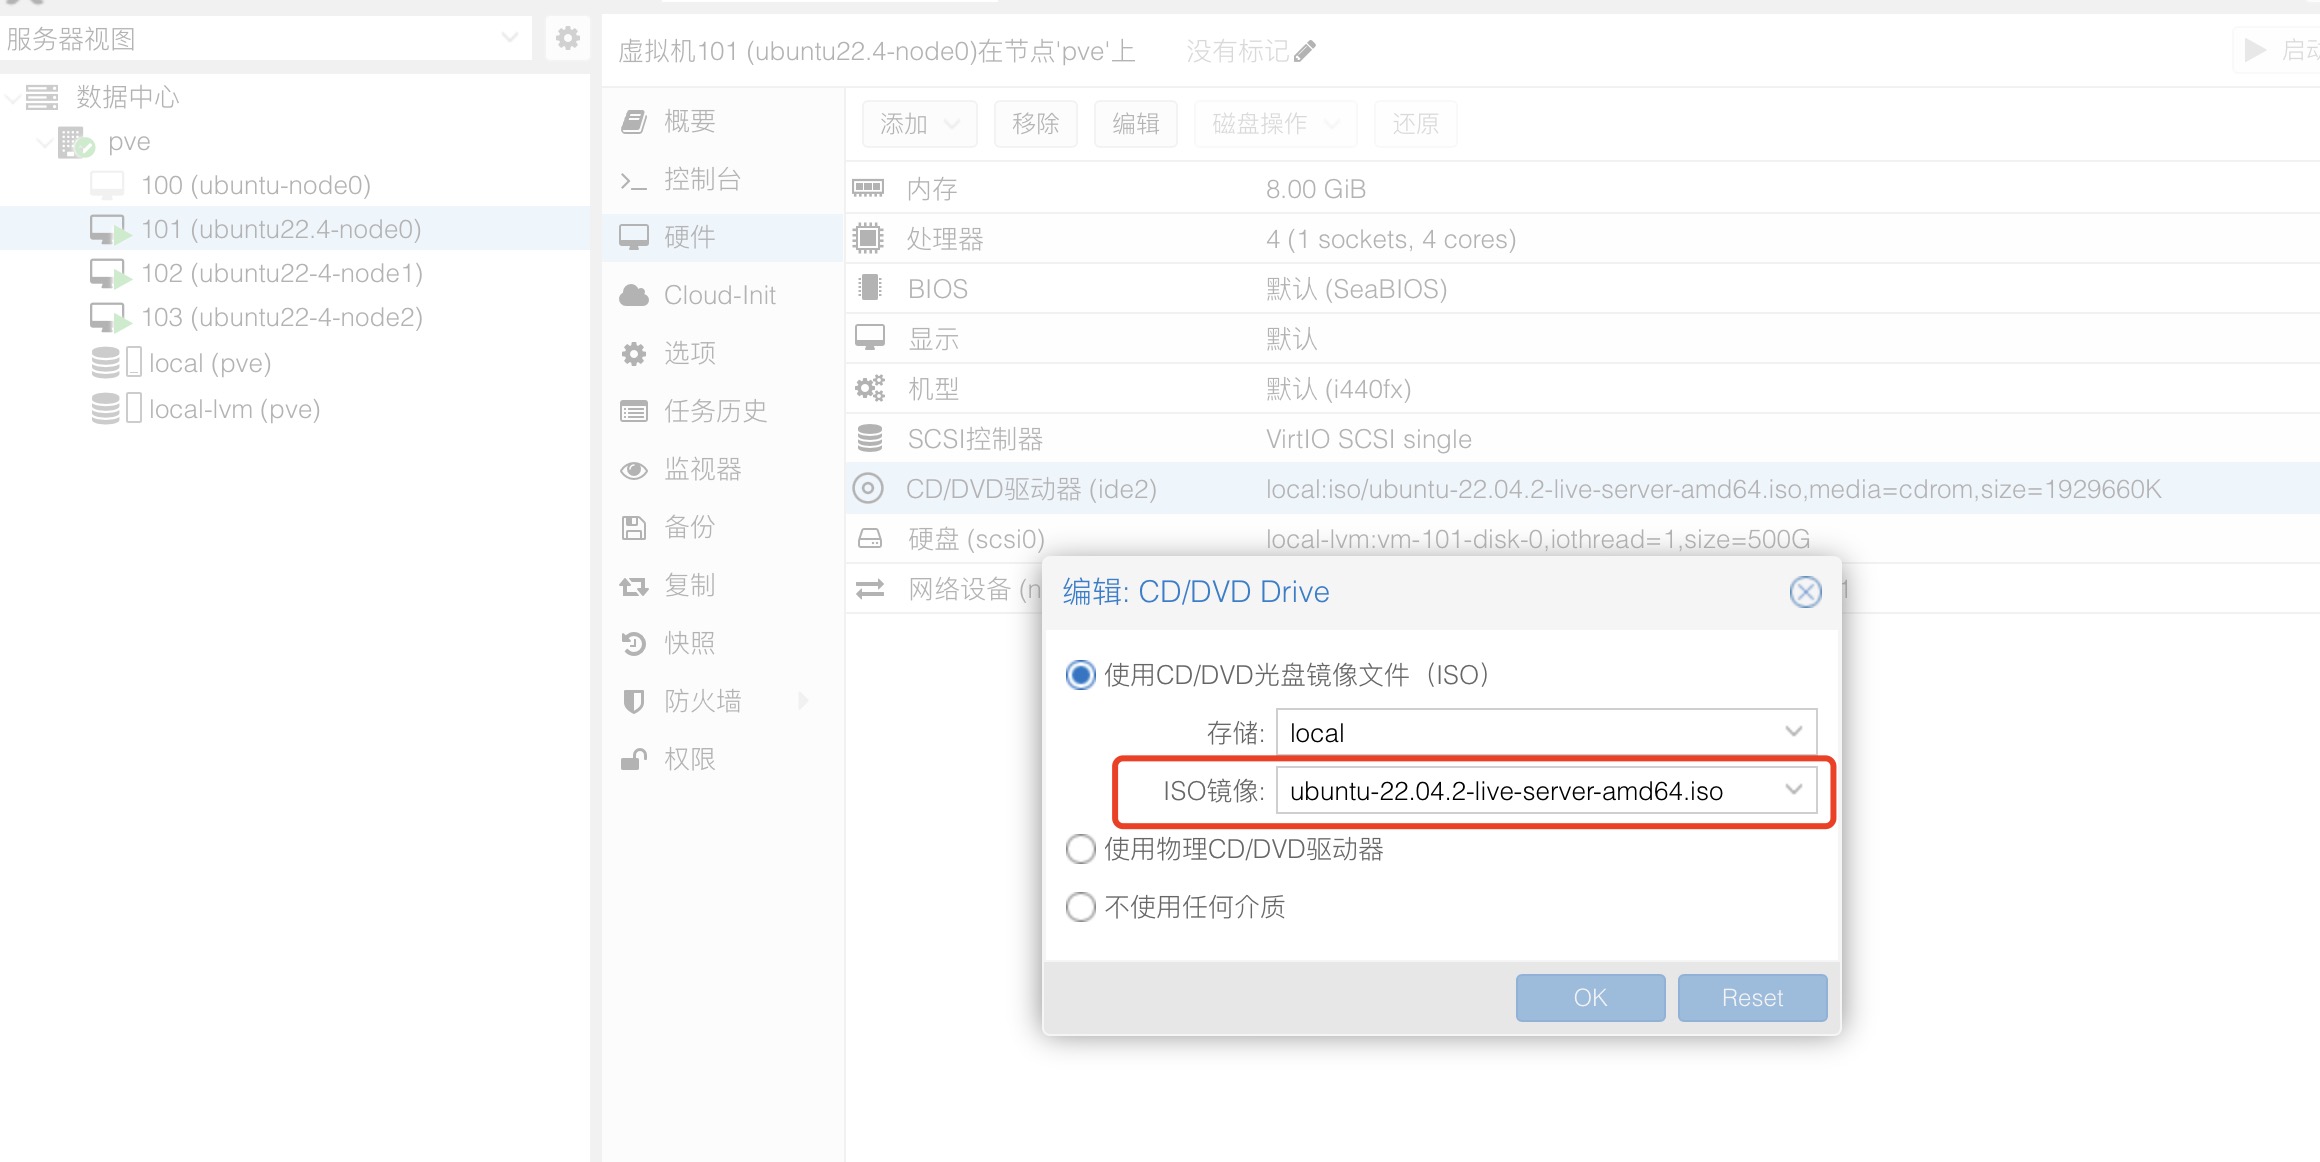
预准备初始环境

创建虚拟机实例

使用Ubuntu22.4.2Iso镜像文件创建虚拟机
先创建一个实例,将初始化k8s集群前的预准备工作做完后使用虚拟机克隆功能复制为三个实例即可。

前置准备

1
2
3
4
5
6
7
8
9
10
11
12
13
14
15
16
17
18
19
20
21
22
23
24
# 配置节点名
$ sudo hostnamectl set-hostname ubuntu22-4-node0
$ sudo vim /etc/hosts
192.168.123.20 ubuntu22-4-node0
192.168.123.21 ubuntu22-4-node1
192.168.123.22 ubuntu22-4-node2
# 关闭swap; 注释/etc/fstab文件的最后一行
$ sudo sed -i '/swap/s/^/#/' /etc/fstab
# 开启IPv4转发
$ sudo cat <<EOF | sudo tee /etc/modules-load.d/k8s.conf
overlay
br_netfilter
EOF

$ modprobe overlay
$ modprobe br_netfilter

$ sudo cat <<EOF | sudo tee /etc/sysctl.d/k8s.conf
net.bridge.bridge-nf-call-iptables = 1
net.bridge.bridge-nf-call-ip6tables = 1
net.ipv4.ip_forward = 1
EOF

$ sudo sysctl --system

安装containerd

1
2
3
4
5
6
7
8
9
10
11
12
13
14
15
16
17
18
19
20
21
22
23
24
25
26
27
28
29
30
31
$ curl -# -O  https://mirrors.aliyun.com/docker-ce/linux/ubuntu/dists/jammy/pool/stable/amd64/containerd.io_1.6.9-1_amd64.deb
$ sudo dpkg -i containerd.io_1.6.9-1_amd64.deb

#导出默认配置
$ sudo mkdir -p /etc/containerd/
$ sudo containerd config default > /etc/containerd/config.toml
#编辑配置文件
$ sudo vim /etc/containerd/config.toml

# 修改
[plugins]
[plugins."io.containerd.grpc.v1.cri"]
sandbox_image = "registry.aliyuncs.com/google_containers/pause:3.6"

# 配置 systemd cgroup 驱动
[plugins."io.containerd.grpc.v1.cri".containerd.runtimes.runc]
...
[plugins."io.containerd.grpc.v1.cri".containerd.runtimes.runc.options]
SystemdCgroup = true

# 配置镜像加速
[plugins."io.containerd.grpc.v1.cri".registry]
[plugins."io.containerd.grpc.v1.cri".registry.mirrors]
[plugins. "io.contianerd.grpc.v1.cri".registry.mirrors."docker.io"]
endpoint = ["https://registry.aliyuncs.com"]

:wq

# 开机自启/重启containerd服务
$ sudo systemctl enable containerd
$ sudo systemctl restart containerd

安装依赖组件

1
2
3
4
5
6
7
8
$ sudo apt-get install -y apt-transport-https ca-certificates curl
# 配置GPG文件
$ sudo curl -fsSLo /usr/share/keyrings/kubernetes-archive-keyring.gpg https://mirrors.aliyun.com/kubernetes/apt/doc/apt-key.gpg
$ sudo echo "deb [signed-by=/usr/share/keyrings/kubernetes-archive-keyring.gpg] http://mirrors.aliyun.com/kubernetes/apt kubernetes-xenial main" | sudo tee /etc/apt/sources.list.d/kubernetes.list
# 安装kubelet、kubeadm、kubectl
sudo apt-get update && sudo apt-get install -y kubelet=1.25.0-00 kubeadm=1.25.0-00 kubectl=1.25.0-00
# 标记软件包,固定版本
sudo apt-mark hold kubelet kubeadm kubectl

扩展虚拟机实例

以上操作完成后可以手动创建一个虚拟机快照,方便后边玩崩了回滚(可选)

使用PVE的虚拟机克隆功能将虚拟机实例ubuntu22-4-node0复制为三个实例。

复制完成后开机,修改主机名以及对应的ip地址
ubuntu22-4-node1 -> 192.168.123.21
ubuntu22-4-node2 -> 192.168.123.22

为三台虚拟机开启ssh互信(可选)

1
2
shubo@ubuntu-node2:~$ ssh-keygen
shubo@ubuntu-node2:~$ ssh-copy-id shubo@192.168.123.1x # 此操作在每个节点都执行一遍

使用kubeadm初始化集群

在 ubuntu22-4-node1/master 执行:

1
2
3
4
5
6
7
$ sudo kubeadm init \
--kubernetes-version=v1.25.0 \
--image-repository registry.aliyuncs.com/google_containers \
--service-cidr=10.96.0.0/12 \
--pod-network-cidr=10.244.0.0/16 \
--cri-socket unix:///run/containerd/containerd.sock \
--v=5

初始化完成后会得到一个token

1
2
3
4
5
6
7
8
9
10
11
12
13
14
15
16
17
18
19
20
Your Kubernetes control-plane has initialized successfully!

To start using your cluster, you need to run the following as a regular user:

mkdir -p $HOME/.kube
sudo cp -i /etc/kubernetes/admin.conf $HOME/.kube/config
sudo chown $(id -u):$(id -g) $HOME/.kube/config

Alternatively, if you are the root user, you can run:

export KUBECONFIG=/etc/kubernetes/admin.conf

You should now deploy a pod network to the cluster.
Run "kubectl apply -f [podnetwork].yaml" with one of the options listed at:
https://kubernetes.io/docs/concepts/cluster-administration/addons/

Then you can join any number of worker nodes by running the following on each as root:

kubeadm join 192.168.123.20:6443 --token l0qicb.ztul7i1t5ihrtb6b \
--discovery-token-ca-cert-hash sha256:08d420cf2aa0984a81849933e31ea5ff5d09d7bc4327404f54d55fde16bd3e7e

在ubuntu22-4-node1,ubuntu22-4-node2 分别执行:

1
sudo kubeadm join 192.168.123.20:6443 --token l0qicb.ztul7i1t5ihrtb6b         --discovery-token-ca-cert-hash sha256:08d420cf2aa0984a81849933e31ea5ff5d09d7bc4327404f54d55fde16bd3e7e --cri-socket unix:///run/containerd/containerd.sock

安装网络插件flannel

此时集群初始化基本就完成了,通过kubectl get nodes命令可以看到node都处于not Ready的状态。这是因为还未安装任何网络插件。

安装flannel

1
2
$ wget https://ghproxy.com/https://raw.githubusercontent.com/flannel-io/flannel/master/Documentation/kube-flannel.yml
$ sudo kubectl apply -f kube-flannel.yml

cluster 初始化完成

1
2
3
4
5
shubo@ubuntu22-4-node0:~$ kubectl get nodes
NAME STATUS ROLES AGE VERSION
ubuntu22-4-node0 Ready control-plane 54m v1.25.0
ubuntu22-4-node1 Ready <none> 43m v1.25.0
ubuntu22-4-node2 Ready <none> 42m v1.25.0

操作系统

Nas Synology
虚拟机 PVE

Host列表

192.168.123.1 router
192.168.123.3 synology
192.168.123.5 pve
192.168.123.20 ubuntu22-4-node0
192.168.123.21 ubuntu22-4-node1
192.168.123.22 ubuntu22-4-node2

不知不觉中走出校园快两年了,这两年的时间,又点亮了很多零零散散的技能点,给自己开几个新坑,并顺带重启的我的HomeLab。

开坑:

  • 使用虚拟机搭建多节点K8s开发环境
  • 搭建可以临时用在公网任何地方并带密码校验的http(科学上网/homelab内网横向访问)代理
  • LeetCode Hot 100 (已经完成80)
  • git cheetsheet
  • 实践(Volumn,ingress)
  • 实践statefulSet,service Mesh,可观测性
  • Lab Server 网络拓扑/操作系统选型(有空再写)
  • Nas 折腾笔记(有空再写)
  • NeoVim (可能的话) …

这道题目主要是使用 回溯法+先序遍历。
以这题来记录一下回溯法的模板吧。

思路

先序遍历(递归模板):

按照 “根、左、右” 的顺序,遍历树的所有节点。

路径记录:

在先序遍历中,记录从根节点到当前节点的路径。当路径为 ① 根节点到叶节点形成的路径 且 ② 各节点值的和等于目标值 sum 时,将此路径加入结果列表

回溯法体现:

每次左子树遍历到叶子结点后,下一次的回溯之前删除path中的尾结点。

代码

1
2
3
4
5
6
7
8
9
10
11
12
13
14
15
16
17
18
19
class Solution {
LinkedList<List<Integer>> res = new LinkedList<>();
LinkedList<Integer> path = new LinkedList<>();
public List<List<Integer>> pathSum(TreeNode root, int sum) {
recur(root, sum);
return res;
}
void recur(TreeNode root, int tar) {
if(root == null) return;
path.add(root.val);
tar -= root.val;
if(tar == 0 && root.left == null && root.right == null)
res.add(new LinkedList(path));
recur(root.left, tar);
recur(root.right, tar);
path.removeLast();
}
}

典中典之二叉树遍历。

常用的BFS和DFS对树的遍历,是很多题目的解题通用模板。掌握这两种方法遍历二叉树尤其重要!!!

在这里进行整理。

DFS(深度优先算法)遍历二叉树

前序遍历为例子。

DFS遍历二叉树的主要实现思路就是使用栈来保存父节点,并依次遍历左右子树。

下文主要以迭代法递归法两种方式来描述。

迭代法(从顶向下)

迭代法比较好理解。

思路

维护一个数组和一个栈。

其中:

数组用来保存每次遍历走过的路径。
栈用来保存每次遍历的结点的父节点。

代码

1
2
3
4
5
6
7
8
9
10
11
12
13
14
15
16
class Solution {
public List<Integer> preorderTraversal(TreeNode root) {
List<Integer> path=new ArrayList<>();
if(root==null){return path;}
Stack<TreeNode> s=new Stack<>();
s.push(root);
while(!s.isEmpty()){
TreeNode curNode=s.pop();
path.add(curNode.val);

if(curNode.right!=null) s.push(curNode.right);
if(curNode.left!=null) s.push(curNode.left);
}
return path;
}
}

递归法

递归法,实际上是利用递归栈的特性来实现的dfs遍历。
递归法虽然理解起来稍微复杂,但直观简洁,一看基本上就能记得住,适合用来当代码模板。

代码

1
2
3
4
5
6
7
8
9
10
11
12
13
14
15
16
class Solution {
public List<Integer> preorderTraversal(TreeNode root) {
List<Integer> res = new ArrayList<Integer>();
preorder(root, res);
return res;
}

public void preorder(TreeNode root, List<Integer> res) {
if (root == null) {
return;
}
res.add(root.val);
preorder(root.left, res);
preorder(root.right, res);
}
}

BFS(广度优先算法)层序遍历二叉树

层序遍历的模板我个人觉得是比较容易接受的。

思路

维护一个数组和一个队列。

其中:

数组用来保存每次遍历走过的路径。
队列用来保存每次遍历的结点的左右子树。

代码

1
2
3
4
5
6
7
8
9
10
11
12
13
14
15
16
17
18
19
20
21
22
public int[] levelOrder(TreeNode root) {
if(root==null) return new int[0];
Queue<TreeNode> q=new LinkedList<>();
q.add(root);
List<Integer> res=new ArrayList<>();
while(!q.isEmpty()){
TreeNode cur=q.poll();
res.add(cur.val);
if(cur.left!=null){
q.add(cur.left);
}
if(cur.right!=null){
q.add(cur.right);
}
 
}
int[] resArray=new int[res.size()];
for(int i=0;i<res.size();i++){
resArray[i]=res.get(i);
}
return resArray;
}

最近找实习问到的题目。。

属于是简单题中的典中典题目了。
整理一下加深印象。。。

题目

给一颗二叉树,输出他的镜像。

例如:

输入:

1
2
3
4
5
     1
/ \
2 3
/ \ / \
4 5 6 7

输出

1
2
3
4
5
     1
/ \
3 2
/ \ / \
7 6 5 4

思路

交换输出二叉树的镜像,实际上就是交换每一个二叉树的左右子树。

最先想到使用栈来保存二叉树的根节点,交换其子树。

代码

使用栈的迭代法:

1
2
3
4
5
6
7
8
9
10
11
12
13
14
15
16
17
18
public TreeNode MirrorTree(TreeNode root){
if(root==null) return null;
Stack<TreeNode> stack =new Stack<>();
stack.add(root);
while(!stack.isEmpty()){
TreeNode root =stack.pop();
TreeNode temp=root.left;
root.left=root.right;
root.right=temp;
if(root.left!=null){
stack.push(root.left);
}
if(root.right!=null){
stack.push(root.right);
}
}
return root;
}

递归法。实际上也是栈。。。递归栈

1
2
3
4
5
6
7
8
public TreeNode MirrorTree(TreeNode root){
if(root==null) return null;
TreeNode r=MirrorTree(root.left);
TreeNode l=MirrorTree(root.right);
root.left=l;
root.right=r;
return root;
}

延伸

回头来看,无论是递归法还是迭代法,其实这道题的解法,不过就是在二叉树的后续遍历模板上多加了一个交换左右子树的功能。

因此立即推==>牢固掌握基础的二叉树操作( 二叉树的DFS和BFS遍历 )的重要性。

前几天面试中提到了这个题目。虽然简单,可是写起来还是花了二十分钟,在这里记录一下。

题目说明

例如给定一个链表

1
1->2->3->4

翻转后返回

1
4->3->2->1

思路

稍微画图就可以很直观的想出链表翻转过程中,需要保存:
    上一个节点  (prev)
    当前节点    (cur)
    后继节点    (next)

代码

(迭代法)

1
2
3
4
5
6
7
8
9
10
11
12
13
public ListNode reverse(ListNode head){
ListNode prev=null;
ListNode next= head.next;
while (next!=null){
head.next=prev;
prev=head;
head=next;
next=next.next;
}
head.next=prev;
prev=head;
return prev;
}

(迭代法优化)

1
2
3
4
5
6
7
8
9
10
11
12
public ListNode reverseList(ListNode head) {
ListNode prev = null;
ListNode curr = head;
while (curr != null) {
ListNode next = curr.next;
curr.next = prev;
prev = curr;
curr = next;
}
return prev;
}

(递归法)

1
2
3
4
5
6
7
8
9
public ListNode reverseList(ListNode head) {
if (head == null || head.next == null) {
return head;
}
ListNode newHead = reverseList(head.next);
head.next.next = head;
head.next = null;
return newHead;
}

(头插法)

1
2
3
4
5
6
7
8
9
10
public ListNode reverseList(ListNode head) {       
ListNode kong=new ListNode();
ListNode temp;
while (head!=null){
temp=head.next;
head.next=kong.next;
kong.next=head; head=temp;
}
return kong.next;
}

剑指 Offer 33. 二叉搜索树的后序遍历序列

输入一个整数数组,判断该数组是不是某二叉搜索树的后序遍历结果。如果是则返回 true,否则返回 false。假设输入的数组的任意两个数字都互不相同。

参考以下这颗二叉搜索树:

1
2
3
4
5
    5
/ \
2 6
/ \
1 3

示例 1:

输入: [1,6,3,2,5]
输出: false

示例 2:

输入: [1,3,2,6,5]
输出: true

思路

由题意知:

二叉搜索树中,左节点<根节点<右节点。

后序遍历顺序:左、右、根。立即推=>根节点就是序列的最后一个元素。

递归:

设本次递归序列的左右边界为i,j。
递归结束条件:
    如果i>=j,立即推=>当前子树的节点数<=1,直接返回true。
递推过程:
    1.从左向右找第一个大于根节点的值,索引记作m。
    2.则可以将序列划分为两个区间 `[i,m-1]` `[m,j]`
    3.此时经过了一次升序和降序的扫描,如果扫描到最后则返回true;
    4.递归左右两个区间,都返回true才是正确的二叉搜索树后序序列。

代码(JAVA)

1
2
3
4
5
6
7
8
9
10
11
12
13
14
15
16
class Solution {
public boolean verifyPostorder(int[] postorder) {
return recur(postorder,0,postorder.length-1);
}
public boolean recur(int[] postorder,int i,int j){
if(i>=j) return true;

int p=i;
while(postorder[p]<postorder[j]) p++;
int m=p;
while(postorder[p]>postorder[j]) p++;
return p==j && recur(postorder,i,m-1) && recur(postorder,m,j-1);
}
}